
Click below to share with students the video of APSMO Explorer arriving at the Land of Possibilities. The first point of exploration is Ice Cream Island.

Step #1: Ice Cream Maker Muddle
- 30 – 40 mins (Guide only. Please take the time that suits your students and your timetable.)
- iPads, tablets or laptops
- Printed Ice Cream Maker: Sorting System activity sheet
- Coloured pencils
Explore Mode: Launch the Ice Cream Maker, and in ‘Explore,’ look at what different ice cream flavours are available. Take some orders from your students and drop then on the shelf. Invite some students to come up and create an ice cream of their choice.

Challenge #1 – Make it a Muddle! There are two options for showing your students an Ice Cream Challenge Muddle. You can show them the video below or model the muddle yourself.
Option #1 – Watch a Video: Click below to watch a video of someone muddling up Challenge #1 with four flavours.

Option #2 – Model the Muddle: Select Challenge #1 and decide how many flavours you want to challenge your students with. The challenge is simplest with three flavours. Changing to four or five flavours makes it more of a challenge.
Once you have decided on your challenge, start making lots of ice cream cones and placing them on the shelf. Don’t be systematic! In your speed, create ice creams that don’t follow the challenge rules, or include duplicates of ice creams you’ve already created. Create a muddled up mix of ice creams. Your students will notice that cells will light up when your ice cream is a duplicate or doesn’t follow the rules. Acknowledge that you probably got a bit carried away, and it might work better if you had a system.
Sorting System Partner Design: Discuss ideas with your students that could help to make a system – lines, colours, drawings, numbers or letters. Hand out Activity Sheet #1 and let your students have 10-15 minutes or so with a partner to discuss and design a system for collecting ice creams that isn’t a muddle. Can they think of a strategy or system to help them track and organise their ice creams?


Collect your students’ designs and keep them ready for Step #2.
Step #2 Ice Cream Systems
- 30 mins (Guide only. Please take the time that suits your students and your timetable.)
- Activity sheets completed in the previous step
- iPads, tablets or laptops
Share and Compare: Distribute the Ice Cream Systems back to your students. Sit together in a circle with all the designs on show.
- Whose look similar?
- Who used colour? Or pictures?
- Did anyone draw a table or a diagram?
- Can students explain their system to a partner?
- Does anyone have a system that is like no one else’s?
Invite students to explain their system to the class, or put pairs together and give each a turn describing their system to the other.
Showcase: Click through this slide show of student examples. Can your students spot similarities? Are there any examples that are new to consider?

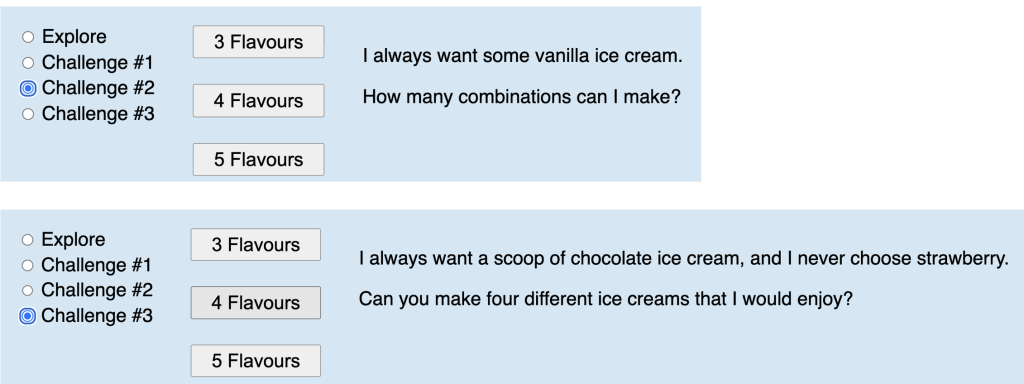
Challenge #2 – It’s time for students and their partners to create a design showing an solution for Challenge #2 or #3, as shown below. You might like to nominate which challenge different partners try and with how many flavours, as Challenge #3 is more complex than the earlier ones.

Prompt them to consider how they might improve their first system using ideas shared by their classmates. Or challenge them to adopt a new approach – for example, using a table or diagram if they didn’t attempt to earlier. After 10 – 15 minutes, gather together to once again share and compare the different ice cream systems that students have created, possibly sorting them into groups on the floor or up on a whiteboard using magnets. Highlights can be used to circle or draw arrows onto design to mark similarities.


Step #3 and Step #4 Ice Cream Task Cards
- 20 – 30 mins each step (Guide only. Please take the time that suits your students and your timetable.)
- Printed task cards and challenge cards for extension students
- Coloured pencils
- Scissors and glue stick
Consider and select which task cards are appropriate for your different students to attempt. We encourage you to place students with a partner – to work with or to work alongside each other. For some of these challenges, students may benefit from having access to Ice Cream Maker on their devices.
Task 7 an Ice Cream sorting task. It is included as an activity for teachers to use to ascertain how confidently and correctly students can separate items that belong and don’t belong to a system, and to observe how students choose to sort their set to check for duplicates and prove all possibilities have been found.

Task Cards C are two Ice Cream tasks where the systems or the conditions are slightly more complex. You might decide to share these with selected students or complete them together as a class.


